21 Apr 2018
•
Cloud Security
• By Glenn Bolton
Encryption at rest means that your data is encrypted as sits on disk, it’s the flipside to encryption in transit, which is the encryption of your data as it passes between systems. SSL/TLS is a good example of encryption in transit.
If you’ve spent much time working with the big cloud providers like AWS or Azure, you might have noticed that they make it pretty easy to encrypt your data at rest. You might have also struggled to think of a good reason for doing this, after all, no one is going to ram-raid an AWS data centre to steal a SAN with your data on it.
I can just delete my data when I don’t need it anymore
Sure, you can delete your block storage volumes and object storage repositories through your cloud provider’s console or API.
Unfortunately, this deletion process doesn’t guarantee the destruction of your data.
So what’s the difference between deletion and destruction?
Destruction of your data means that it’s gone through a process that makes it impossible (or exceptionally hard) to recover.
When you send a delete request to your cloud provider, your data might disappear from your view immediately, but it also might:
- Stick around on a backend while waiting for a clean-up process
- Persist on the underlying storage
- Exist in backups.
All of these things are outside of your knowledge and control.
Deletion is putting your sensitive documents in the bin.
Destruction is shredding or burning them.
It’s 🗑️ vs 💥🔥.
Why should I care about destroying my data?
In most jurisdictions, if you collect personal information about your customers or users, you have specific legal obligations around protecting that data. You can’t outsource responsibility for the protection of that data - you need to make sure that you can track and manage the lifecycle of that data, including its destruction when it is no longer needed.
If I can’t just delete it, how do I destroy it?
In a traditional on-premise environment you might have destroyed your data by using a secure disk wipe process and then verifying the physical destruction of the storage media. Cloud providers do the same thing, but you don’t have any control over this process or any real assurance that they destroyed your specific data adequately.
Encryption at rest helps you destroy your data.
Let that sink in for a minute, and I’ll explain.
You can destroy your data by destroying the keys that unlock (decrypt) that data.
By destroying your keys, you destroy the ability to decrypt your data. If the data can’t be decrypted, it can’t be used. This process is called crypto-shredding.
🔑+💥=😃👍💯
While cloud providers don’t give you many options to destroy your data on disk, their key management systems are the exception to this rule. Deletion of an AWS KMS Customer Master Key (CMK) for example is destructive and irreversible (their words, not mine).
Encryption at rest helps you control the lifecycle of your data, even when you don’t control the storage.
Enable encryption before you up upload your data.
On AWS use S3 encryption and EBS encryption, and on Azure, the equivalent Storage Service Encryption and Azure Disk Encryption.
21 Mar 2018
•
Defendable Design Project
• By Glenn Bolton
Defendable Design for AWS can automatically find and selectively fix both dangerous security group rules and leaky S3 buckets 🙌. It even keeps you in the loop about what’s happening in real time on Slack.
This post is an overview of the AWS infrastructure and services that enable this — serverlessly.
Architecture

View this diagram on Cloudcraft
How it works
Config Notifications
These steps are represented by the top and left parts of the diagram.
- AWS Config:
Config records configuration changes in the account.
- Config Notifications:
Changes detected by AWS config are sent as notifications to SNS which sends these notifications to the Notifier Lambda function.
- Notifier:
The Notifier function selectively sends some of these notifications - just the ones about config rule status changes - to Slack.
Config Rules
These steps are shown in the centre-left of the diagram.
- Config Rules:
A combination of AWS-managed and custom Config Rules continuously measure the compliance of assets in the account to look for problems.
The status changes for these rules is also recorded by Config.
- Custom Config Rule Functions:
The custom config rules are backed by Python-based Lambda functions. These functions perform compliance checks which return results back to AWS Config. When a compliance failure is detected the function pushes a message with the required steps to fix the failure to the central Remediation Queue.
- Remediation Queue:
This is where remediation actions queue, waiting to be picked up.
These steps are shown in the top-right and centre-right.
- Scheduled Event Rule:
A CloudWatch scheduled event fires every 60 seconds to launch the Remediation Coordinator function.
When you set enable_auto_response to false, it disables this scheduled event. The remediation tools are still built by Terraform, they’re just never triggered.
- Remediation Coordinator:
The Remediation Coordinator function performs two main functions.
- It picks up things to fix from the Remediation Queue.
- It determines which Remediation Function is the right one for that particular type of problem and forwards a copy of the message to it.
- Remediation Function:
The relevant Remediation Function performs the required Remediation Action to fix that problem, and then deletes the original source message from the Remediation Queue. It then sends a message to the Notifier function about the actions it took.
- Notifier:
The Notifier function formats and forwards this message to Slack.
Continuous Compliance with Continuous Enforcement
This design provides a model for enabling continuous compliance and continuous enforcement in your AWS accounts, whether you download what I’ve already written, or take the DIY path.
If you want to give this a try:
If you’re already running production workloads in your account, definitely leave enable_auto_response off (it’s off by default) until you’re sure that you’re not relying on any bad security groups or public S3 buckets to keep things running.
You can check what automated response actions would have been taken by taking a peek at the messages in the Remediation Queue.
18 Mar 2018
•
Defendable Design Project
• By Glenn Bolton
If you’re not already aware of the Center for Internet Security, they’re a non-profit organisation who do amazing work to help infosec practitioners and sysadmins harden their systems.
CIS produce a series of Benchmarks (among other things) for a wide variety of technology tools and platforms. The CIS Benchmarks provide best-practice guidance on how to secure these systems.
Helpfully, the CIS AWS Foundations Benchmark tells you what you should do to help secure your AWS account.
Measuring better
You can quickly test how your own AWS account ranks against the benchmark using the aws-cis-foundation-benchmark-checklist from AWS Labs.
Given that the latest updates to DD-AWS include better coverage against the benchmark, I thought I’d do a quick before and after comparison.
For the sake of keeping it simple, I’ve excluded any of the manual checks from my scoring, and only count the controls that the benchmark defines as scored.
| Before DD-AWS |
After DD-AWS |
| 27% 😞📉 |
82% 😊📈 |
Obviously, your mileage may vary, and depending on how you run things the numbers in your own account might differ.
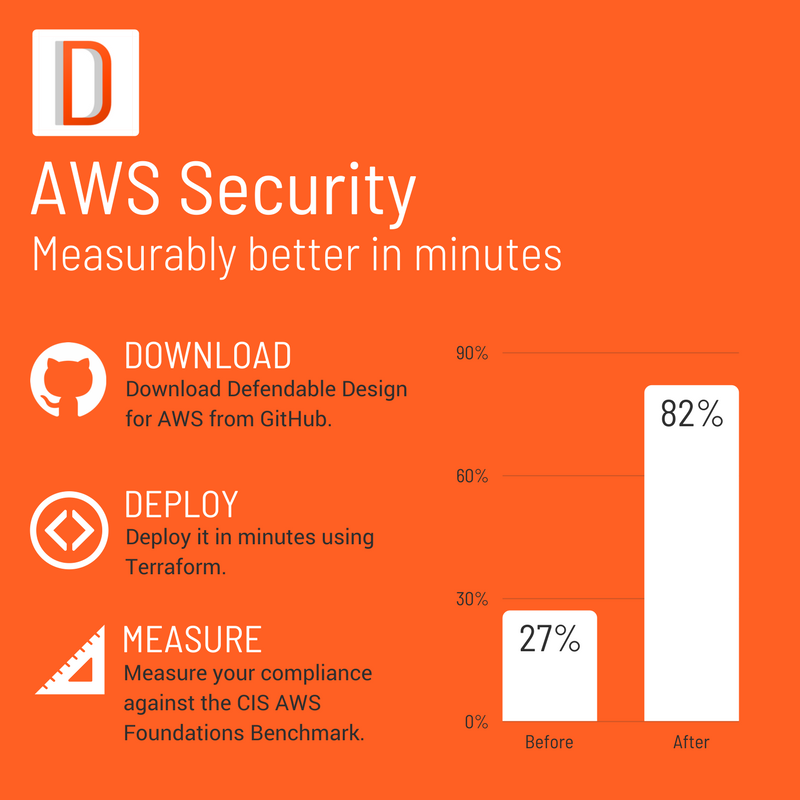
Download, deploy, measure
Download the latest release from GitHub to try it out:
https://github.com/DefendableDesign/DD-AWS/releases/
Deploy it using the instructions here:
https://github.com/DefendableDesign/DD-AWS/blob/master/README.md
Be mindful that if your account is in a bit of a sorry state, it might be better to leave enable_auto_response off (it’s off by default) until you’re sure that you’re not relying on any bad security groups or public S3 buckets.
When it comes to cost control 👛, DD-AWS costs me around $10 (USD) per month to run.
Depending on your existing free tier consumption, and the volume of CloudTrail and Config events, you might pay more than this.
Measure your compliance with the benchmark, before and after using AWS’ checklist tool:
https://github.com/awslabs/aws-security-benchmark/tree/master/aws_cis_foundation_framework
11 Mar 2018
•
Defendable Design Project
• By Glenn Bolton
An alarmingly large number of severe data breaches lately have been attributed to poorly configured S3 buckets. Unfortunately, we see this time and time and time again.
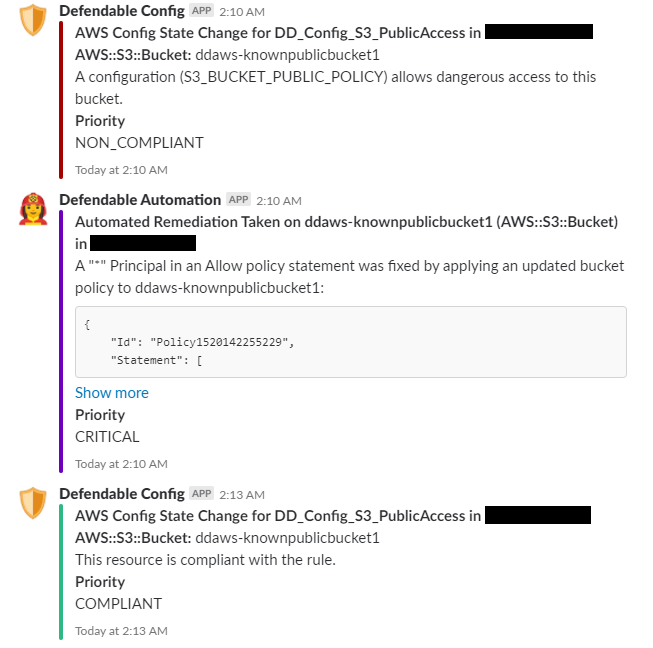
The good news is that latest update to DD-AWS now includes self healing for leaky S3 buckets 🎉.
How it works
-
A custom AWS Config Rule checks S3 buckets for dangerous permissions in real time (almost) whenever a change occurs.
-
When a bucket is detected as non-compliant, the Config Rule status changes, and a remediation task is pushed to an SQS queue.
-
The Remediation_Coordinator Lambda function periodically (every 1m) pulls tasks from the Remediation queue and fires off the correct function to fix the problem, in this case the S3_PublicAccess_Remediation function.
-
The S3_PublicAccess_Remediation function will selectively remove the dangerous part of the Access Control Policy, or Bucket Policy and then call the AWS API to PutBucketAcl or PutBucketPolicy to remediate the risk.
-
If you’ve enabled Slack integration, the Notifier function lets you know everything that’s happening, at every step of the way:
What it looks like in action
What it costs
DD-AWS is open source and is released at no cost under a MIT license.
The current version costs around USD $10 per month to run from underlying AWS infrastructure costs. This price will depend on the volume of your CloudTrail logs for S3 and CloudWatch Logs storage costs.
Get it from GitHub
Download the latest release from GitHub to try it out:
https://github.com/DefendableDesign/DD-AWS/releases/
17 Jan 2018
•
Security Analytics
• By Glenn Bolton
The AWS CloudTrail service records the history of AWS API calls for your account. You can use this to your advantage to automatically detect when someone or something makes a dangerous security group change in your account.
Also, I’ve already lied to you - sorry about that. The term real time might be a bit of a stretch here so let me explain.
Typically, when ingesting CloudTrail logs into Splunk you’ll first configure CloudTrail to send events to S3 with notifications sent to SNS + SQS when a new log file is delivered. Splunk is then configured with the CloudTrail input, which polls SQS for notifications before downloading log files from S3 which are then indexed for searching.
In practice, this typically amounts to a delay of 10-20 minutes before your CloudTrail events are searchable in Splunk. Some of this delay is on the AWS side of things and can’t be avoided.
A newer approach involves using Kinesis and Splunk HTTP Event Collector to push streams of events to Splunk, rather than the standard push-pull approach. This option might work out a bit faster (I haven’t tried it yet), but you’ll still be limited by the speed of CloudTrail log delivery on AWS’ side.
Here’s how to get this setup, and how to search for security group changes that open specific ports to the internet.
1. Enable CloudTrail
This part’s a piece of cake and can be done entirely in the AWS console:
- Configure CloudTrail to send events to S3
- Make sure you’ve enabled SNS notifications
- Create a standard SQS queue
- Subscribe the queue to the SNS topic from step 2.
- Follow the instructions for configuring an SQS-based S3 input.
3. Search for Events
Let’s get straight to business, here’s the query you need to find security group changes where potentially dangerous ports are exposed to the internet:
index=aws-cloudtrail eventName=AuthorizeSecurityGroupIngress
| spath output=ipp path=requestParameters.ipPermissions.items{}
| spath output=securityGroup path=requestParameters.groupId
| spath output=user path=userIdentity.arn
| mvexpand ipp
| spath input=ipp output=fromPort path=fromPort
| spath input=ipp output=toPort path=toPort
| spath input=ipp output=ipRanges path=ipRanges
| spath input=ipRanges output=srcCidrs path=items{}.cidrIp
| mvexpand srcCidrs
| search srcCidrs="0.0.0.0/0"
| search (
    (fromPort <= 22 AND toPort >= 22) OR
    (fromPort <= 3389 AND toPort >= 3389) OR
    (fromPort <= 3306 AND toPort >= 3306) OR
    (fromPort <= 1433 AND toPort >= 1433)
  )
| table _time, user, securityGroup, fromPort, toPort, srcCidrs
In case you’re new to Splunk, or not maybe just not familiar with spath and mvexpand, let me break this query down:
index=aws-cloudtrail eventName=AuthorizeSecurityGroupIngress
- This tells Splunk to search for events in the ‘aws-cloudtrail’ index which have the CloudTrail event name
AuthorizeSecurityGroupIngress. If your index is called something else, you will need to adjust this line accordingly.
- The
spath 📚 command lets you easily perform inline field extraction from complex data types, like JSON.
- Here we pull out some useful parts of the JSON event, like the IpPermission data, referring to it here as
ipp.
- You’ll notice two
mvexpand 📚 commands.
- An
AuthorizeSecurityGroupIngress event can contain multiple IpPermissions, so we expand these into separate events.
- An
IpPermission can contain more than one source CIDR, so we expand these into separate events as well.
| search srcCidrs="0.0.0.0/0"
- This tells Splunk that we’re only interested in the events which open access to the internet (0.0.0.0/0 - all source IP addresses).
(fromPort <= 22 AND toPort >= 22)
- Querying for events where the lower port is less than or equal to our offending port, and the upper port is greater than or equal to the offending port will ensure that we pick up violations when the port is part of a range. A range of 20 - 30 for example will include port 22, this approach picks these up.
| table _time, user, securityGroup, fromPort, toPort, srcCidrs
- This formats things nicely 🤷.
The better way
The better way is security as code offering reliable, repeatable and scalable controls that automatically intervene when security problems occur.
The Defendable Design project attempts to build a standard, self-healing design for strong security on AWS using security as code to orchestrate AWS-native functionality, including AWS CloudTrail, AWS Config and AWS Lambda.
While it’s still early days, the project already detects and automatically rolls back dangerous security group changes and might be a better choice for you than automatically detecting, but manually remediating security misconfigurations.
Alternatively, if your security team is already invested in Splunk, and you’re not quite ready to let software make automatic changes to your security groups - this approach should serve you well.
About some bugs
If you’re managing hundreds of AWS accounts, and you have all of your CloudTrail events configured to go the same SNS topic (so that you don’t have to configure Splunk whenever a new AWS account comes or goes) you might encounter a bug with the Splunk CloudTrail input where it gets stuck in a polling loop. Ask me how to fix this if this happens to you.